Thursday, October 28, 2010

Custom needle case


I can't believe I didn't do this sooner!
I just got back from a great trip with the hubby, and this little needle case was awesome to carry all my knit/crochet stuff. I made it just before we left after realizing that the only bag I had big enough to carry all my yarn had no pockets for needles or anything. Then I remembered I had this absolutely adorable kitten fabric laying around (I had actually been hoarding it for a project worthy of it's cuteness!)... And voila ;D
I know there are a few patterns available on the web, but here's mine which used exactly 2 fat quarters, and a 12 inch piece of ribbon:


Cut your 2 fat quarters so you have 2 pieces 5x18 inches, and 2 pieces 18x18 inches.
A. Stitch the 2 smaller pieces together (right sides facing) as shown in diagram using .5 inch seams. Clip the corners and turn right side out. This is the pocket piece.
B. Lay out one of the larger pieces right side up. Place the pocket piece just made on top and sew pocket separations as indicated in diagram B. You can place as many as you like here, evenly spaced or not.
C. Fold ribbon tie in half and stitch in place as shown. Stitch as close to the edge of the fabric as possible to avoid stitches showing when everything is done.
D. Now take the final large piece of fabric and lay it on top (with right sides facing) and stitch as shown in diagram D, using .25 inch seam. Clip corners and turn out through opening left in the bottom edge. Press and top stitch bottom edge to close.

Enjoy ;D

Click on the diagram below to enlarge:
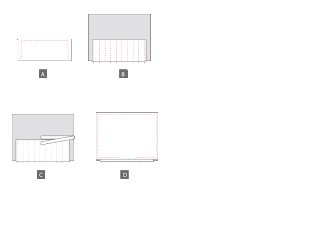

In my photo you'll notice I didn't use ribbon, that's because I had enough fabric to make a tie. This is simple 2 pieces of 1.5 x 12.5 inch fabric stitched together(right sides facing) with .25 inch seam leaving 1 inch opening on one of the long edges, corners clipped, turned right side out, and pressed.

Tuesday, October 12, 2010

Spooky cute Halloween projects


So I love Halloween! It's my favorite holiday to decorate for, and this year is no exception...
I have a few Halloween themed patterns available, but this one was made just for me. This little wolf boy has been on my mind for a while (I think I first sketched him out last year) and I'm so glad I finally took the time to create him! I did some experimenting to get his hair just the way I pictured it, using a latch hook technique to attach wool yarn in 5 different colors to the head. Then brushing the hair with a wire pet brush, and finally working the hair rubbing and twisting in my fingers until it was the shape I wanted. As an accent I also added quilting thread, felt, and fabric strips to the hair in strategic spots to get a slightly "wild" look. I used the same process on the tail... and yes it took a really long time, but he is just what I wanted!

What are you working on for Halloween? What are you thinking about making...
Are you like me, do you have one of those projects that just doesn't make the cut year after year? Let's hear about it!

Friday, October 8, 2010

Crochet-a-long: Manuel part 4


Last part, here we go!

When we attached the legs to the belly(part1) we left 9 leg stitches open per leg, and these are the stitches we are going to pick up and use to begin the main body. So choose a leg as the starting point (they're all the same so it's your choice), find the first stitch(right most stitch, closest to the belly)and attach yarn. The starting point you choose will be the center back of the monkey. Begin R1 here.


R1-3: SC across. (36 sts)
R4: SC next 10, begin attaching muzzle by lining up 15 stitches of the last row of the muzzle with next 15 stitches of body and work SC through both layers, SC last 11. (36 sts)
R5: SC next 4, join first ear by lining up next 6 sts with 6 sts of bind of edge of the ear(make sure the ear is facing the front!) SC through both layers, SC across 15 remaining muzzle sts, attach second ear over next 6 sts, SC last 5 sts. (36 sts)
R6: unravel last 3 sts made, begin attaching tail by lining up 9 sts of tail to next 9 sts of the body, SC next 30 sts.
R7: SC across working across 9 remaining tail sts.

Begin decreases.
R8: *SC 4, DCR1 over next 2 sts * repeat across. (30 sts)
R9: *SC 3, DCR1 over next 2 sts * repeat across. (24 sts)
R10: *SC 2, DCR1 over next 2 sts * repeat across. (18 sts)
R11: *SC 1, DCR1 over next 2 sts* repeat across. (12 sts)
Time to stuff...
Stuff the legs first, stuffing pretty firmly. Then the body and tail. You can also add a wire to the tail at this point (if you want it to be posable). Otherwise you can pose it when your monkey is complete and stitch it in place. If you are using safety eyes you will want to attach them now as well.

R12: *DCR1 over next 2 sts* repeat across. (6 sts)
Bind off leaving a long tail. Weave tail through remaining stitches and pull to close. Secure and pull tail to inside to hide.


All that's left to do now are your finishing touches: eyes, expressions, accessories, anything you can think of!

Let's see your finished product! Post it on Ravelry: CAL with DawnToussaint

Tuesday, October 5, 2010

Crochet-a-long: Manuel part 3


We're up to the head now! Manuel's ear is worked similar to Padma's... but smaller;D
OK, ready for part 3?

EARS(make 2)
Start with (color A)a magic circle into which 6 SC are made.
R1: INCR1 in each stitch across. (12 sts)
R2: *SC 1, INCR1 in next st* repeat across. (18 sts)
R3-7: SC across.
R8: Skip next 6 sts (pushing them to the back), SC across. (12 sts)
R9: ch1, flatten the remaining stitches so that the next st is aligned with the last st of the round(st1 & st12). SC across stitching through both layers to close up ear. After 6th stitch, bind off and set aside.


Want to see how everyone else is progressing? Join us on Ravelry: CAL with DawnToussaint

Friday, October 1, 2010

Crochet-a-long: Manuel part 2


Part 2 is a piece of cake, enjoy ;D

TAIL(make 1)
Start with (color B) a magic circle into which 6 SC are made.
R1: INCR1 in each stitch across (12 sts)
R2: *SC 1, INCR1* repeat across (18 sts)
R3 to end: SC until piece measures about 5-6 inches from beginning.
bind off and set aside.

MUZZLE(make 1)
Start with (color A) a magic circle into which 6 SC are made.
R1: INCR1 in each stitch across (12 sts)
R2: *SC 1, INCR1* repeat across (18 sts)
R3-4: SC across.
R5: *SC 2, INCR1* repeat across (24 sts)
R6: *SC 3, INCR1* repeat across (30 sts)
bind off and set aside.